
前言
运维自动化的发展历程以及技术应用
- 本地部署
On-Premises 如下都需要自己 部署/配置 以及维护。
ApplicationDataRuntimeMiddlewareOSVirtualizationServersStorageNetWorking
- 基础设施既服务 ( 如 阿里云 )
IaaS - Infrastructure as a Service 如下需要自己 部署/配置 以及维护。
ApplicationDataRuntimeMiddlewareOS
- 平台既服务 ( 如 阿里云- ACK 容器服务 )
PaaS - Platform as a Service 如下需要自己 部署/配置 以及维护。
- 软件既服务 ( 如 各类软件 微信、钉钉、邮箱 )
SaaS - Software as a Service 所有的服务软件都不需要自己维护, 直接使用既可。
ansible
ansible 简介
ansible 是基于 python2-paramiko 模块开发的自动化运维工具。 实现了批量系统配置, 批量程序部署, 批量运行命令等功能。ansible 是基于模块工作的, 本身没有批量部署的能力。真正具有批量部署的是 ansible 所运行的模块, ansible 只是提供了一种框架。
ansible 集合了众多运维工具( pupet、cfengine、chef、func、fabric、saltstack )的优点
ansible 发展史
ansible 特性
基于 Python 开发
模块化: 调用特定的模块(如: Paramiko、PyYAML、jinja2 等), 完成特定的任务。
支持自定义模块
部署简单, 基于Linux内置的 Python 、Open-SSH 和另一个 agentless 组件.
支持 PlayBook 编排任务
幂等性: 任务重复执行等于只执行一次, 不会重复执行多次相同命令。
无需代理不依赖PKI.
支持多语言模块编写.
YAML格式编排任务,支持丰富的数据结构.
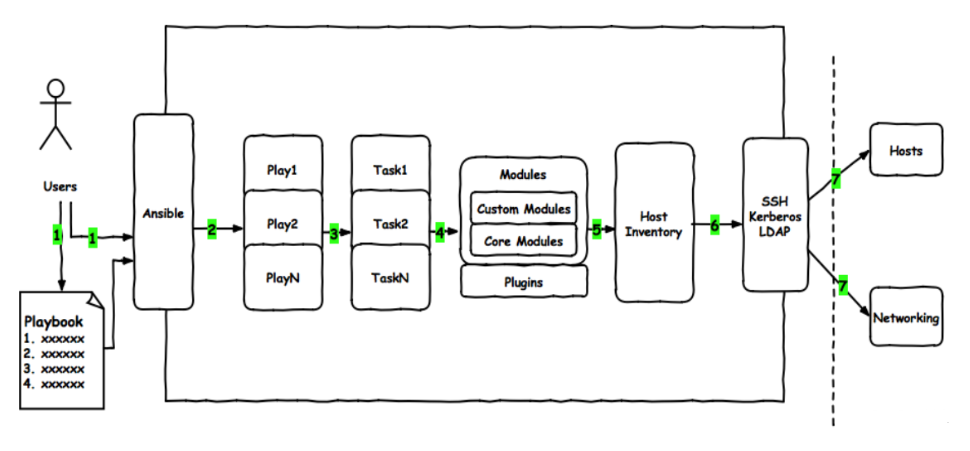
ansible 架构


ansible 主要组成部分:
ansible playbooks: 任务剧本(任务集), 通过编排定义ansible任务集合的配置文件, 由ansible 顺序依次执行, 文件通常是 JSON格式的YML文件。
Roles: 角色, 多个 ansilbe playbooks 的集合.
Inventory: ansible 管理主机的清单 默认为 /etc/ansible/hosts 文件。
Modules: ansible 执行命令的功能模块, 一般为ansible内置核心模块, 也可以自定义第三方模块.
plugins: ansible 功能插件, 是功能模块的补充. 如: 连接类型插件、循环插件、变量插件、过滤插件等等.
Api: 提供第三方程序调用的开放接口.
ansible: ansible 的客户端命令工具. 执行 ansible 命令的主要程序.
ansible 安装
1
2
3
4
5
6
7
8
9
|
[root@jicki ~]# ansible --version
ansible 2.9.10
  config file = /etc/ansible/ansible.cfg
  configured module search path = [u'/root/.ansible/plugins/modules', u'/usr/share/ansible/plugins/modules']
  ansible python module location = /usr/lib/python2.7/site-packages/ansible
  executable location = /usr/bin/ansible
  python version = 2.7.5 (default, Apr  2 2020, 13:16:51) [GCC 4.8.5 20150623 (Red Hat 4.8.5-39)]
|
ansible 相关说明
/etc/ansible/ansible.cfg 主配置文件, 配置ansible的工作特性.
/etc/ansible/hosts 主机清单.
/etc/ansible/roles/ 存放(roles)角色的目录.
/usr/bin/ansible 二进制执行文件, ansible 主程序.
/usr/bin/ansilbe-doc 配置文档, 模块功能查看工具.
/usr/bin/ansible-galaxy 用于上传/下载 roles 模块到官方平台的工具.
/usr/bin/ansible-playbook 自动化任务、编排剧本工具/usr/bin/ansible-pull 远程执行命令的工具.
/usr/bin/ansible-vault 文件(如: playbook 文件) 加密工具.
/usr/bin/ansible-console 基于 界面的用户交互执行工具.
/etc/ansible/hosts
创建秘钥 ssh-keygen -t rsa -f ~/.ssh/id_rsa -C "jicki"
拷贝秘钥到其他被控端 ssh-copy-id ip
主机清单文件
 1
 2
 3
 4
 5
 6
 7
 8
 9
10
11
12
13
14
15
16
17
18
19
20
21
22
23
24
25
26
27
28
29
30
31
32
33
34
35
36
37
38
| # #号为注释
# 单主机 直接写入 ip 或 nameserver
192.168.168.10
# 非标准22端口可直接用 : 填入
192.168.168.10:999
db1.example.com:999
# []包含的为主机组 如下
[webservers]
192.168.168.10
192.168.168.11
192.168.168.12
192.168.168.13
# 主机也支持 nameserver 如下
[dbservers]
db1.example.com
db2.example.com
db3.example.com
db4.example.com
# 主机支持 [1:10] 类型的多主机 如下
[docker]
# 等同于 192.168.168.10 ~ 192.168.168.120
192.168.168.1[0:20]
# 主机也支持 [a:z] 类型的 nameserver 如下
[kubernetes]
# 等同于 master-a ~ master-c
master-[a:c]
# 等同于 node-c ~ node-g
node-[c:g]
|
 1
 2
 3
 4
 5
 6
 7
 8
 9
10
11
12
13
14
15
16
17
18
19
20
21
22
23
24
25
26
27
28
29
30
31
32
33
34
35
36
37
38
39
40
41
42
43
44
45
46
47
| # ansible 通过 单主机进行操作 ( -k 为用户密码方式, 默认为 ssh-key )
ansible 192.168.168.10 -m ping -k
# ansible 通过 ':' 组合进行操作
ansible "192.168.168.10:192.168.168.20" -m ping -k
# ansible 通过 通配符加主机 进行操作
ansible 192.168.168.* -m ping -k
# ansible 通过 hosts 组名称 进行操作
ansible webservers -m ping -k
# ansible 通过 ':' 组合组进行操作
ansible 'webservers:dbservers' -m ping -k
# ansible 通过 通配符 进行操作
ansible '*servers' -m ping -k
# ansible 通过 ':&' 逻辑与 (两个组中都包含的主机)
ansible 'webservers:&dbservers' -m ping -k
# ansible 通过 ':!' 逻辑非 (在webservers 但不在 dbservers的主机)
ansible 'webservers:!dbservers' -m ping -k
# ansible 也支持多逻辑的组合
ansible 'webservers:dbserver:&appserver:!ftpservers' -m ping -k
# ansible 也支持正则表达式
ansible '~(web|db)serever' -m ping -k
# ansible 通过 all 对 hosts 清单下所有主机进行操作
ansible all -m ping -k
# ansible 通过 通配符 对 hosts 清单下所有主机进行操作
ansible '*' -m ping -k
|
1
2
3
4
5
6
7
8
| [root@jicki opt]# ansible all -m ping
10.0.3.13 | SUCCESS => {
"ansible_facts": {
"discovered_interpreter_python": "/usr/bin/python"
},
"changed": false,
"ping": "pong"
}
|
/etc/ansible/ansible.cfg
ansible 主配置文件
 1
 2
 3
 4
 5
 6
 7
 8
 9
10
11
12
13
14
15
16
17
18
19
20
21
22
23
24
25
26
27
28
29
30
31
32
33
34
35
36
37
38
39
40
41
42
43
44
45
46
47
48
49
50
51
52
53
54
55
56
57
| # defaults 为默认配置
[defaults]
# 主机清单的路径, 默认为如下
#inventory = /etc/ansible/hosts
# 模块存放的路径
#library = /usr/share/my_modules/
# utils 模块存放路径
#module_utils = /usr/share/my_module_utils/
# 远程主机脚本临时存放目录
#remote_tmp = ~/.ansible/tmp
# 管理节点脚本临时存放目录
#local_tmp = ~/.ansible/tmp
# 插件的配置文件路径
#plugin_filters_cfg = /etc/ansible/plugin_filters.yml
# 执行并发数
#forks = 5
# 异步任务查询间隔 单位秒
#poll_interval = 15
# sudo 指定用户
#sudo_user = root
# 运行 ansible 是否提示输入sudo密码
#ask_sudo_pass = True
# 运行 ansible 是否提示输入密码 同 -k
#ask_pass = True
# 远程传输模式
#transport = smart
# SSH 默认端口
#remote_port = 22
# 模块运行默认语言环境
#module_lang = C
# roles 存放路径
#roles_path = /etc/ansible/roles
# 不检查 /root/.ssh/known_hosts 文件 建议取消
#host_key_checking = False
# ansible 操作日志路径 建议打开
#log_path = /var/log/ansible.log
|
ansible 相关操作
ansible 执行过程
加载配置文件 /etc/ansible/ansible.cfg.
加载对应的模块文件.
通过 ansible 将模块或命令生成对应的临时 py 文件, 并将该临时文件 传输至远程服务器的对应 执行用户 临时目录下 $HOME/.ansible/tmp/ansible-tmp-2123/xxx.py >文件.
对临时 py 文件授权 ( chmod u+x xx.py ).
执行 py 文件,并返回执行结果.
删除临时的 py 文件, sleep 0 退出.
ansible-doc
1
2
3
4
5
6
7
8
| # 例子
ansible-doc -l
ansible-doc ping
ansible-doc -s ping
|
ansible
ansible 常用模块
截止 2020-08-10 ansible 模块为 3387 个.
Command 模块
shell 模块
Script 模块
Copy 模块
copy 模块: 拷贝文件到远程主机.
`ansible all -m copy -a ‘src=/root/xxx.txt dest=/root/1.txt backup=yes’
ansible all -m copy -a 'src=/root/1.txt dest=/root/2.txt mode=0644 owner=jicki group=jicki'
mode: 修改权限
owner: 修改用户
group: 修改用户组
ansible all -m copy -a 'content="hello\nworld\n" dest=/root/2.txt'
Fetch 模块
fetch 模块: 将远程主机的文件, 下载到本机中, 下载成功会存放在以 主机 IP/名称 的文件夹中, 会包含原文件的整体路径. (只能下载单个文件, 不支持目录, 可先打包成压缩包, 再进行下载)
File 模块
Cron 模块
cron 模块: 为远程主机添加定时任务.
ansible all -m cron -a 'weekday=1-5 job="echo date >> /root/1.txt" name=echocron'
day: 表示 天. 支持 ( 1-31, *, */2 ) 写法
hour: 表示 小时. 支持 ( 0-23, *, */2 ) 写法
minute: 表示 分钟. 支持 ( 0-59, *, */2 ) 写法
month: 表示 月. 支持 ( 1-12, *, */2 ) 写法
weekday: 表示 星期. 支持 ( 0-6, Sunday-Saturday, * )写法
job: 表示 计划任务的内容.
name: 表示 计划任务名称. 相同的计划任务名称会覆盖.
ansible all -m cron -a 'disabled=true job="echo date >> /root/1.txt" name=echocron'
ansible all -m cron -a 'name=echocron state=absent'
stateabsent 删除计划任务. 删除计划任务 只需要指定 name 既可.
Yum 模块
Service 模块
User 模块
Group 模块
ansible-galaxy
通过 https://galaxy.ansible.com/ 页面下载
ansible-galaxy 工具用于下载对应的roles
ansible-galaxy list geerlingguy.nginx
ansible-galaxy install geerlingguy.nginx
install: 下载 roles 角色. 会下载到 $HOME/.ansible/roles/ 目录下
ansible-galaxy remove geerlingguy.nginx
remove: 删除已下载的 roles 角色. 在目录中删除也可以.
ansible playbook
playbook 流程图
playbook 与 YAML 描述
playbook 核心元素
hosts : 远程主机列表 ( ip / 主机名 / 组名 )
tasks : 任务集, 任务列表, 有两种写法
action: module args : action: 模块名 参数
module: args : 模块名: 参数 (一般使用这种)
ignore_errors: True 当前 task 出错时仍然会向下执行
varniables : 内置变量或自定义变量在 playbook 文件中调用
templates : 模板, 可替换模板文件中的变量并实现一些简单逻辑的文件
handles : 与 notity 结合使用, 由特定条件触发的操作, 满足条件才执行, 否则不执行
tags : 标签 指定任务执行, 用于执行一个 playbook 中的部分代码. 主要用于测试.
ansible-playbook 命令
ansible-playbook
-C / --check : Check 检查脚本运行情况, 不会在远程服务器里运行.
--list-hosts : 列出运行此 任务 的主机.
--list-tasks : 列出任务组的具体任务列表.
--limit : 只对主机列表中的某台主机执行.
-v -vv -vvv : 显示详细的执行过程, v 越多就越详细.
ansible-playbook 变量
- 变量名要求: 只允许使用
字母 、数字 、 _ 组成, 而且只能以 字母开头.
通过文件自定义变量:
/etc/ansible/hosts 文件中定义
对主机组中的主机单独定义变量, 优先级高于公共变量.
对主机组中的所有主机定义统一变量, 优先级低于对单独主机定义的变量.
 1
 2
 3
 4
 5
 6
 7
 8
 9
10
|
[appserver]
# 对单独主机 定义变量 node_id
10.0.3.13 node_id=13

# 对主机组 定义统一变量 domain_name
[appserver:vars]
domain_name=jicki.cn
|
- 使用变量 就可以灵活配置不同主机的
hostname
1
2
3
4
5
6
7
8
| ---
- hosts: all
remote_user: root
tasks:
- name: set hostname
hostname: name={{ node_id }}.{{ domain_name }}
|
在 playbook 文件里 定义变量.
通过 {{ 变量名 }} 使用变量.
通过 vars: 列表 定义多个 变量.
 1
 2
 3
 4
 5
 6
 7
 8
 9
10
11
12
13
14
|
---
- hosts: all
  remote_user: root

  # 定义变量
  vars:
    - pkg_name: httpd

  tasks:
    - name: install {{ pkg_name }}
      # 使用变量
      yum: name={{ pkg_name }}
|
1
2
3
4
| ---
pkg_name: httpd
file_name: jicki.cn
|
 1
 2
 3
 4
 5
 6
 7
 8
 9
10
11
12
13
14
15
| ---
- hosts: all
remote_user: root
# 配置模板文件
vars_files:
# 指定文件的路径
- vars.yml
tasks:
- name: install {{ pkg_name }}
yum: name={{ pkg_name }}
- name: create {{ file_name }} file
file: name=/root/{{ file_name }}.txt state=touch
|
 1
 2
 3
 4
 5
 6
 7
 8
 9
10
11
12
13
14
15
16
17
|
[root@jicki ansible]# ansible-playbook install.yml

PLAY [all] *******************************************************************************************************

TASK [Gathering Facts] *******************************************************************************************
ok: [10.0.3.13]

TASK [install httpd] *********************************************************************************************
changed: [10.0.3.13]

TASK [create jicki.cn file] **************************************************************************************
changed: [10.0.3.13]

PLAY RECAP *******************************************************************************************************
10.0.3.13                  : ok=3    changed=2    unreachable=0    failed=0    skipped=0    rescued=0    ignored=0
|
ansible-playbook template
- template 是一个模块,并且只能用于 playbook 下.
1
2
3
4
5
| [root@jicki nginx]# tree .
.
|-- nginx.yml
`-- templates
`-- nginx.conf.j2
|
算术运算
 1
 2
 3
 4
 5
 6
 7
 8
 9
10
11
12
13
14
15
16
17
18
19
20
21
22
23
24
25
26
27
28
29
30
31
32
33
34
35
36
37
38
39
40
41
42
43
44
45
46
47
48
49
50
51
52
| user nginx;
# 这里使用 环境变量 vcpus * 2
worker_processes {{ ansible_processor_vcpus * 2 }};
error_log /var/log/nginx/error.log;
pid /run/nginx.pid;
include /usr/share/nginx/modules/*.conf;
events {
worker_connections 1024;
}
http {
log_format main '$remote_addr - $remote_user [$time_local] "$request" '
'$status $body_bytes_sent "$http_referer" '
'"$http_user_agent" "$http_x_forwarded_for"';
access_log /var/log/nginx/access.log main;
sendfile on;
tcp_nopush on;
tcp_nodelay on;
keepalive_timeout 65;
types_hash_max_size 2048;
include /etc/nginx/mime.types;
default_type application/octet-stream;
include /etc/nginx/conf.d/*.conf;
server {
listen 80 default_server;
listen [::]:80 default_server;
server_name _;
root /usr/share/nginx/html;
# Load configuration files for the default server block.
include /etc/nginx/default.d/*.conf;
location / {
}
error_page 404 /404.html;
location = /40x.html {
}
error_page 500 502 503 504 /50x.html;
location = /50x.html {
}
}
}
|
 1
 2
 3
 4
 5
 6
 7
 8
 9
10
11
12
13
14
15
16
17
18
19
| ---
- hosts: all
remote_user: root
tasks:
- name: install nginx
yum: name=nginx
- name: template conf
# 如果 yml 与 templates 目录同级, src 直接写.j2 文件
template: src=nginx.conf.j2 dest=/etc/nginx/nginx.conf
notify:
- restart nginx
- name: start nginx
service: name=nginx state=started enabled=yes
handlers:
- name: restart nginx
service: name=nginx state=restarted
|
when 条件语句
1
2
3
4
5
6
| [root@jicki nginx]# tree .
.
|-- nginx.yml
`-- templates
|-- nginx.conf.centos7.j2
`-- nginx.conf.centos8.j2
|
 1
 2
 3
 4
 5
 6
 7
 8
 9
10
11
12
13
14
15
16
17
18
19
20
21
22
23
24
25
26
27
28
| ---
- hosts: all
remote_user: root
tasks:
- name: install nginx
yum: name=nginx
- name: template centos 7 conf
# 如果 yml 与 templates 目录同级, src 直接写.j2 文件
template: src=nginx.conf.centos7.j2 dest=/etc/nginx/nginx.conf
# 使用 when 语句进行判断 如果变量为 "7" 执行这个
when: ansible_distribution_major_version == "7"
notify:
- restart nginx
- name: template centos 8 conf
# 如果 yml 与 templates 目录同级, src 直接写.j2 文件
template: src=nginx.conf.centos8.j2 dest=/etc/nginx/nginx.conf
# 使用 when 语句进行判断 如果变量为 "8" 执行这个
when: ansible_distribution_major_version == "8"
notify:
- restart nginx
- name: start nginx
service: name=nginx state=started enabled=yes
handlers:
- name: restart nginx
service: name=nginx state=restarted
|
执行 playbook 文件
skipping 状态表示跳过执行这个 TASK .
 1
 2
 3
 4
 5
 6
 7
 8
 9
10
11
12
13
14
15
16
17
18
19
20
21
22
23
24
25
26
|
[root@jicki nginx]# ansible-playbook nginx.yml

PLAY [all] *******************************************************************************************

TASK [Gathering Facts] *******************************************************************************
ok: [10.0.3.13]

TASK [install nginx] *********************************************************************************
ok: [10.0.3.13]

TASK [template centos 7 conf] ************************************************************************
changed: [10.0.3.13]

TASK [template centos 8 conf] ************************************************************************
skipping: [10.0.3.13]

TASK [start nginx] ***********************************************************************************
ok: [10.0.3.13]

RUNNING HANDLER [restart nginx] **********************************************************************
changed: [10.0.3.13]

PLAY RECAP *******************************************************************************************
10.0.3.13      : ok=5    changed=2    unreachable=0    failed=0    skipped=1    rescued=0    ignored=0
|
迭代变量 with_tiems
迭代 with_items 执行重复任务.
- 对于迭代选项, 固定变量名为
item . - 在
task 中使用 with_items 指定需要迭代的元素列表.
playbook 文件
 1
 2
 3
 4
 5
 6
 7
 8
 9
10
11
12
13
14
15
16
17
18
19
| ---
- hosts: all
remote_user: root
tasks:
- name: create some files
# {{ item }} 为特殊变量, 代表 with_items 列表中的内容
file: name=/tmp/{{ item }} state=touch
with_items:
- file1
- file2
- file3
- file4
- name: install some software
yum: name={{ item }}
with_items:
- htop
- sl
- hping3
|
代嵌套子变量 (字典)
 1
 2
 3
 4
 5
 6
 7
 8
 9
10
11
12
13
14
15
16
17
18
19
20
21
22
23
24
25
26
27
28
29
30
31
32
33
34
35
36
37
38
39
40
41
42
|
---
- hosts: all
  remote_user: root

  tasks:
    - name: create some files
      # {{ item }} 为特殊变量, 代表 with_itmes 列表中的内容
      file: name=/tmp/{{ item }} state=touch
      with_items:
        - file1
        - file2
        - file3
        - file4

    - name: create some group
      group: name={{ item }}
      with_items:
        - j1
        - j2
        - j3
        - j4

    - name: create some user
      # 使用 item.key值 进行引用
      user: name={{ item.name }} group={{ item.group }}
      # 使用 字典 定义 嵌套的子 变量
      with_items:
        - { name: 'file1', group: 'j1' }
        - { name: 'file2', group: 'j2' }
        - { name: 'file3', group: 'j3' }
        - { name: 'file4', group: 'j4' }

    - name: permission some files
      file: name=/tmp/{{ item.name }} owner={{ item.name }} group={{ item.group }}
      with_items:
        - { file: 'file1', name: 'file1', group: 'j1' }
        - { file: 'file2', name: 'file2', group: 'j2' }
        - { file: 'file3', name: 'file3', group: 'j3' }
        - { file: 'file4', name: 'file4', group: 'j4' }
|
 1
 2
 3
 4
 5
 6
 7
 8
 9
10
11
12
13
14
15
16
17
18
19
20
21
22
23
24
25
26
27
28
29
30
31
32
33
34
| [root@jicki ansible]# ansible-playbook file.yml
PLAY [all] *****************************************************************************************
TASK [Gathering Facts] *****************************************************************************
ok: [10.0.3.13]
TASK [create some files] ***************************************************************************
changed: [10.0.3.13] => (item=file1)
changed: [10.0.3.13] => (item=file2)
changed: [10.0.3.13] => (item=file3)
changed: [10.0.3.13] => (item=file4)
TASK [create some group] ***************************************************************************
changed: [10.0.3.13] => (item=j1)
changed: [10.0.3.13] => (item=j2)
changed: [10.0.3.13] => (item=j3)
changed: [10.0.3.13] => (item=j4)
TASK [create some user] ****************************************************************************
changed: [10.0.3.13] => (item={u'group': u'j1', u'name': u'file1'})
changed: [10.0.3.13] => (item={u'group': u'j2', u'name': u'file2'})
changed: [10.0.3.13] => (item={u'group': u'j3', u'name': u'file3'})
changed: [10.0.3.13] => (item={u'group': u'j4', u'name': u'file4'})
TASK [permission some files] ***********************************************************************
changed: [10.0.3.13] => (item={u'group': u'j1', u'name': u'file1', u'file': u'file1'})
changed: [10.0.3.13] => (item={u'group': u'j2', u'name': u'file2', u'file': u'file2'})
changed: [10.0.3.13] => (item={u'group': u'j3', u'name': u'file3', u'file': u'file3'})
changed: [10.0.3.13] => (item={u'group': u'j4', u'name': u'file4', u'file': u'file4'})
PLAY RECAP *****************************************************************************************
10.0.3.13 : ok=5 changed=4 unreachable=0 failed=0 skipped=0 rescued=0 ignored=0
|
流程控制、循环 for 与 if
for 循环
{% for 语句块 %} ... {% endfor %}
 1
 2
 3
 4
 5
 6
 7
 8
 9
10
11
12
13
14
15
16
17
18
19
20
21
22
23
24
25
26
27
28
29
30
31
| ---
- hosts: all
remote_user: root
vars:
# 列表的形式
listen_port:
- 80
- 81
- 82
# 字典的形式
service:
- name: web1
domain: jicki.cn
port: 90
user: nginx
path: /var/www/html
- name: web2
domain: jicki.cn
port: 91
user: nginx
path: /var/www/html
- name: web3
domain: jicki.cn
port: 92
user: nginx
path: /var/www/html
tasks:
- name: copy template conf
template: src=for.conf.j2 dest=/root/for.conf
|
for.conf.j2 文件
{% for port in listen_port %} 语句 listen_port 为 playbook 中定义的 vars .
1
2
3
4
5
6
7
8
| {% for port in listen_port %}
server {
listen {{ port }}
}
{% endfor %}
|
 1
 2
 3
 4
 5
 6
 7
 8
 9
10
11
12
13
14
15
16
| [root@jicki ~]# cat /root/for.conf
server {
listen 80
}
server {
listen 81
}
server {
listen 82
}
|
 1
 2
 3
 4
 5
 6
 7
 8
 9
10
11
12
13
14
15
16
17
18
19
20
21
22
23
24
25
26
| ---
- hosts: all
remote_user: root
vars:
# 字典的形式
service:
- name: web1
domain: jicki.cn
port: 90
user: nginx
path: /var/www/html
- name: web2
domain: jicki.cn
port: 91
user: nginx
path: /var/www/html
- name: web3
domain: jicki.cn
port: 92
user: nginx
path: /var/www/html
tasks:
- name: copy template conf
template: src=nginx.conf.j2 dest=/root/nginx.conf
|
 1
 2
 3
 4
 5
 6
 7
 8
 9
10
11
12
13
| {% for s in service %}
user {{ s.user }};
worker_processes {{ ansible_processor_vcpus + 2 }};
pid /run/nginx.pid;
server {
listen {{ s.port }} default_server;
listen [::]:{{ s.port }} default_server;
server_name {{ s.name }}.{{ s.domain }};
root {{ s.path }};
}
{% endfor %}
|
 1
 2
 3
 4
 5
 6
 7
 8
 9
10
11
12
13
14
15
16
17
18
19
20
21
22
23
24
25
26
27
28
29
30
|
user nginx;
worker_processes 3;
pid /run/nginx.pid;
    server {
        listen       90 default_server;
        listen       [::]:90 default_server;
        server_name  web1.jicki.cn;
        root         /var/www/html;
    }

user nginx;
worker_processes 3;
pid /run/nginx.pid;
    server {
        listen       91 default_server;
        listen       [::]:91 default_server;
        server_name  web2.jicki.cn;
        root         /var/www/html;
    }

user nginx;
worker_processes 3;
pid /run/nginx.pid;
    server {
        listen       92 default_server;
        listen       [::]:92 default_server;
        server_name  web3.jicki.cn;
        root         /var/www/html;
    }
|
if 流程控制
{% if 语句块 %} ... {% else %} ... {% endif %}
playbook 文件
- 其中 web1, web2 不没有 user 变量, web3 包含 user 变量.
 1
 2
 3
 4
 5
 6
 7
 8
 9
10
11
12
13
14
15
16
17
18
19
20
21
22
23
24
25
26
27
28
|
---
- hosts: all
  remote_user: root

  vars:
    # 字典的形式
    service:
      - name: web1
        domain: jicki.cn
        port: 90
        path: /var/www/html

      - name: web2
        domain: jicki.cn
        port: 91
        path: /var/www/html

      - name: web3
        domain: jicki.cn
        port: 92
        user: nginx
        path: /var/www/html

  tasks:
    - name: copy template conf
      template: src=nginx.conf.j2 dest=/root/nginx.conf
|
nginx.conf.j2 文件
{% if s.user is defined %} 判断 是否有 s.user 这个变量
 1
 2
 3
 4
 5
 6
 7
 8
 9
10
11
12
13
14
15
16
17
18
|
{% for s in service %}

{% if s.user is defined %}
user {{ s.user }};
{% else %}
user root;
{% endif %}
worker_processes {{ ansible_processor_vcpus + 2 }};
pid /run/nginx.pid;
    server {
        listen       {{ s.port }} default_server;
        server_name  {{ s.name }}.{{ s.domain }};
        root         {{ s.path }};
    }

{% endfor %}
|
查看生成后的 nginx.conf
- 第一个 不包含 s.user 变量 所以
user root; - 第二个 不包含 s.user 变量 所以
user root; - 第三个 包含 s.user 变量 所以
user nginx; 等于变量值
 1
 2
 3
 4
 5
 6
 7
 8
 9
10
11
12
13
14
15
16
17
18
19
20
21
22
23
24
25
26
27
28
29
30
31
|
user root;
worker_processes 3;
pid /run/nginx.pid;
    server {
        listen       90 default_server;
        server_name  web1.jicki.cn;
        root         /var/www/html;
    }


user root;
worker_processes 3;
pid /run/nginx.pid;
    server {
        listen       91 default_server;
        server_name  web2.jicki.cn;
        root         /var/www/html;
    }


user nginx;
worker_processes 3;
pid /run/nginx.pid;
    server {
        listen       92 default_server;
        server_name  web3.jicki.cn;
        root         /var/www/html;
    }
|
Example - tasks
 1
 2
 3
 4
 5
 6
 7
 8
 9
10
11
12
13
14
15
16
17
18
| ---
# 指定主机组
- hosts: all
# 指定执行 用户
remote_user: root
# 任务
tasks:
# 任务的名称
- name: ping server
ping:
- name: echo hostname
# shell 为模块名, 后面等同于 -a '' 参数
shell: hostname
- name: touch file
file: name=/tmp/file.txt state=touch
- name: echo file
shell: ls -l /tmp/file.txt
|
 1
 2
 3
 4
 5
 6
 7
 8
 9
10
11
12
13
14
15
16
17
18
19
20
21
| PLAY [all] **********************************************************
TASK [Gathering Facts] **********************************************
ok: [10.0.3.13]
TASK [ping server] **************************************************
ok: [10.0.3.13]
TASK [echo hostname] ************************************************
changed: [10.0.3.13]
TASK [touch file] ***************************************************
changed: [10.0.3.13]
TASK [echo file] ****************************************************
changed: [10.0.3.13]
PLAY RECAP **********************************************************
10.0.3.13 : ok=5 changed=3 unreachable=0 failed=0 skipped=0 rescued=0 ignored=0
|
Example - handles
handles 与 notity 结合的例子
- 同一个
name 下可以定义多个 notify 配置关联到不同的 handlers 中.
 1
 2
 3
 4
 5
 6
 7
 8
 9
10
11
12
| - hosts: all
remote_user: root
tasks:
- name: copy httpd.conf
copy: src=/root/ansible/httpd.conf dest=/etc/httpd/conf/httpd.conf backup=yes
# 关联多个触发器的写法
notify:
- restart httpd
- check status httpd
- check network port
|
 1
 2
 3
 4
 5
 6
 7
 8
 9
10
11
12
13
14
15
16
17
18
19
| ---
- hosts: all
remote_user: root
tasks:
- name: install httpd
yum: name=httpd
- name: copy httpd.conf
copy: src=/root/ansible/httpd.conf dest=/etc/httpd/conf/httpd.conf backup=yes
# 此任务 如果有变动会触发如下定义名称的触发器
notify: restart httpd
- name: start httpd
service: name=httpd state=started enabled=yes
# 触发器, 需要配置 notify 触发
handlers:
- name: restart httpd
service: name=httpd state=restarted
|
 1
 2
 3
 4
 5
 6
 7
 8
 9
10
11
12
13
14
15
16
17
18
|
PLAY [all] ********************************************************************************************************

TASK [Gathering Facts] ********************************************************************************************
ok: [10.0.3.13]

TASK [install httpd] **********************************************************************************************
changed: [10.0.3.13]

TASK [copy httpd.conf] ********************************************************************************************
ok: [10.0.3.13]

TASK [start httpd] ************************************************************************************************
changed: [10.0.3.13]

PLAY RECAP ********************************************************************************************************
10.0.3.13                  : ok=4    changed=2    unreachable=0    failed=0    skipped=0    rescued=0    ignored=0
|
 1
 2
 3
 4
 5
 6
 7
 8
 9
10
11
12
13
14
15
16
17
18
19
20
21
22
|
PLAY [all] ********************************************************************************************************

TASK [Gathering Facts] ********************************************************************************************
ok: [10.0.3.13]

TASK [install httpd] **********************************************************************************************
ok: [10.0.3.13]

TASK [copy httpd.conf] ********************************************************************************************
changed: [10.0.3.13]

TASK [start httpd] ************************************************************************************************
ok: [10.0.3.13]

RUNNING HANDLER [restart httpd] ***********************************************************************************
changed: [10.0.3.13]

PLAY RECAP ********************************************************************************************************
10.0.3.13                  : ok=5    changed=2    unreachable=0    failed=0    skipped=0    rescued=0    ignored=0
|
 1
 2
 3
 4
 5
 6
 7
 8
 9
10
11
12
13
14
15
16
17
18
19
20
21
22
23
| ---
- hosts: all
remote_user: root
tasks:
- name: install httpd
yum: name=httpd
- name: copy httpd.conf
copy: src=/root/ansible/httpd.conf dest=/etc/httpd/conf/httpd.conf backup=yes
# 此任务 如果有变动会触发如下定义名称的触发器
notify:
- restart httpd
# 定义标签
tags: cpconf
- name: start httpd
service: name=httpd state=started enabled=yes
# 定义标签
tags: sthttpd
# 触发器, 需要配置 notify 触发
handlers:
- name: restart httpd
service: name=httpd state=restarted
|
 1
 2
 3
 4
 5
 6
 7
 8
 9
10
11
12
13
| [root@jicki ansible]# ansible-playbook -t sthttpd httpd.yml
PLAY [all] ********************************************************************************************************
TASK [Gathering Facts] ********************************************************************************************
ok: [10.0.3.13]
TASK [start httpd] ************************************************************************************************
changed: [10.0.3.13]
PLAY RECAP ********************************************************************************************************
10.0.3.13 : ok=2 changed=1 unreachable=0 failed=0 skipped=0 rescued=0 ignored=0
|
ansible-vault
ansible-console
ansible-console: 可交互执行命令, 支持 Tab 键.
1
2
3
4
5
6
| [root@jicki ~]# ansible-console
Welcome to the ansible console.
Type help or ? to list commands.
root@all (1)[f:5]$
|
root@all (1) [f:5]$
root: 当前执行用户.all: 表示当前主机清单.(1): 表示当前主机清单下包含 1 台主机.[f:5]: 表示并发执行任务数为 5 个.
ansible Roles
Roles 既 (角色) 是 ansible v1.2 版本引入的新特性, 用于 层次性、结构化的组织 playbook.
Roles 能够根据层次结构自动加载- 变量文件、tasks、handler、template 文件等. 简单来讲就是将 这些文件归类到各自单独的文件目录中, 使 playbook 文件可以更好的通过 include 这些文件目录.
Roles 一般用于基于 主机构建服务 的场景中, 但也可以用于构建 守护进程 等场景.
Roles 官方定义默认的目录为 /etc/ansible/roles 下.
1
2
3
4
5
6
| [root@jicki ansible]# tree .
.
|-- ansible.cfg
|-- hosts
`-- roles
`-- nginx
|
roles 目录结构
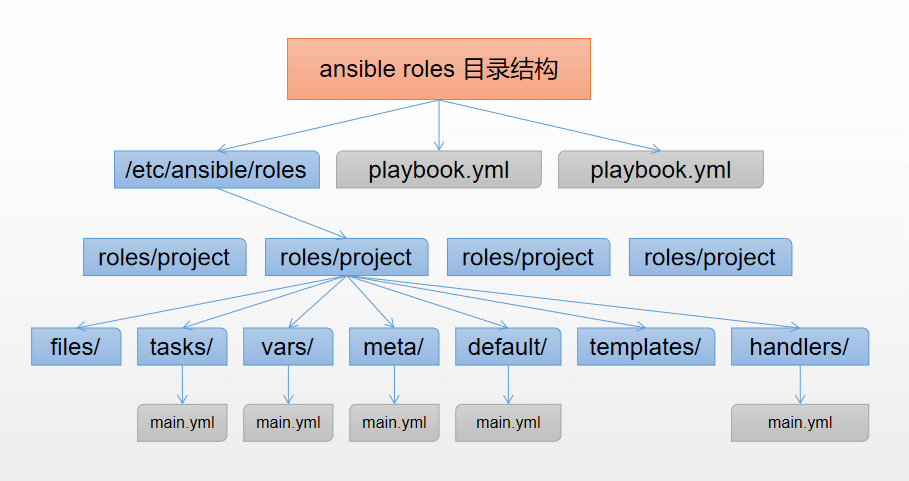
目录结构说明
roles: - 所有的角色必须放在roles目录下, 这个目录可以自定义位置. 默认的位置在 /etc/ansible/rolesplaybook.yml: - 剧本文件.project: - 具体的角色项目名称, 比如 nginx、tomcat、php .files: - 用于存放由copy 或script 模块调用的文件.templates: - 用于存放 Jinja2 模板, template 模块会自动在此目录中寻找 Jinja2 模板文件.tasks: - 此目录应当包含一个main.yml文件, 用于定义此角色的任务列表, 此文件可以使用include包含其它的位于此目录的 task 文件.handlers: - 此目录应当包含一个main.yml文件, 用于定义此角色中触发条件时执行的动作.vars: - 此目录应当包含一个main.yml文件, 用于定义此角色用到的变量.defaults: - 目录应当包含一个main.yml文件, 用于为当前角色设定默认变量.meta: - 此目录应当包含一个main.yml文件, 用于定义此角色的特殊设定及其依赖关系.
 1
 2
 3
 4
 5
 6
 7
 8
 9
10
| [root@jicki roles]# tree .
.
`-- nginx
|-- defaults
|-- files
|-- handlers
|-- meta
|-- tasks
|-- templates
`-- vars
|
 1
 2
 3
 4
 5
 6
 7
 8
 9
10
11
12
13
14
15
16
17
18
| [root@jicki ansible]# tree roles/
roles/
`-- nginx
|-- defaults
|-- files
|-- handlers
|-- meta
|-- tasks
| |-- group.yml
| |-- main.yml
| |-- restart.yml
| |-- start.yml
| |-- template.yml
| |-- user.yml
| `-- yum.yml
|-- templates
| `-- nginx.conf.j2
`-- vars
|
/etc/ansible/nginx_roles.yml 与 roles 同级
 1
 2
 3
 4
 5
 6
 7
 8
 9
10
|
---
- hosts: all
  remote_user: root

  # 选择 roles 属性
  roles:
      # 调用 role 目录. roles 同级的目录
    - role: nginx
|
1
2
3
4
5
6
| - include: group.yml
- include: user.yml
- include: yum.yml
- include: template.yml
- include: start.yml
|
/etc/ansible/roles/nginx/tasks/group.yml 单独的 tasks 文件只写单独的内容 如下:
1
2
| - name: create group
group: name=nginx gid=80
|
- 执行
/etc/ansible/nginx_roles.yml 文件
 1
 2
 3
 4
 5
 6
 7
 8
 9
10
11
12
13
14
15
16
17
18
19
20
21
22
23
24
25
26
27
|
[root@jicki ansible]# ansible-playbook nginx_roles.yml

PLAY [all] ****************************************************************************************

TASK [Gathering Facts] ****************************************************************************
ok: [10.0.3.13]

TASK [nginx : create group] ***********************************************************************
changed: [10.0.3.13]

TASK [nginx : create user] ************************************************************************
changed: [10.0.3.13]

TASK [nginx : install package] ********************************************************************
changed: [10.0.3.13]

TASK [nginx : copy conf] **************************************************************************
changed: [10.0.3.13]

TASK [nginx : start service] **********************************************************************
changed: [10.0.3.13]

PLAY RECAP ****************************************************************************************
10.0.3.13   : ok=6    changed=5    unreachable=0    failed=0    skipped=0    rescued=0    ignored=0
|
roles tags 标签
- 在 playbook 文件中 对 roles 配置相应的 tags .
 1
 2
 3
 4
 5
 6
 7
 8
 9
10
11
12
13
| ---
- hosts: all
remote_user: root
# 选择 roles 属性
roles:
# 配置相应的 tags 用 { } 引用
- { role: nginx, tags: ['web', 'nginx'] }
- { role: mysql, tags: ['db', 'mysql'] }
- { role: redis, tags: ['db', 'redis'] }
- { role: golang, tags: ['web', 'golang'] }
- { role: app, tags: "app" }
|
1
2
| [root@jicki ansible]# ansible-playbook -t web playbook.yml
|
roles when 语句
- 对 role 进行条件的判断.
ansible_distribution_major_version == "7"
 1
 2
 3
 4
 5
 6
 7
 8
 9
10
11
12
13
14
| ---
- hosts: all
remote_user: root
# 选择 roles 属性
roles:
# 配置相应的 tags 用 { } 引用
- { role: nginx, tags: ['web', 'nginx'] }
- { role: mysql, tags: ['db', 'mysql'] }
- { role: redis, tags: ['db', 'redis'] }
# 只针对 系统的 版本 为 7 的执行
- { role: golang, tags: ['web', 'golang'], when: ansible_distribution_major_version == "7" }
- { role: app, tags: "app" }
|
Example - roles
 1
 2
 3
 4
 5
 6
 7
 8
 9
10
11
12
13
14
15
16
17
18
19
20
21
22
23
24
25
26
| [root@jicki ansible]# tree .
.
|-- ansible.cfg
|-- hosts
|-- nginx_roles.yml
`-- roles
`-- nginx
|-- defaults
|-- files
| `-- default.conf
|-- handlers
| `-- main.yml
|-- meta
|-- tasks
| |-- copyfile.yml
| |-- group.yml
| |-- main.yml
| |-- start.yml
| |-- template.yml
| |-- user.yml
| `-- yum.yml
|-- templates
| `-- nginx.conf.j2
`-- vars
`-- main.yml
|
1
2
3
4
5
6
7
8
| ---
- hosts: all
remote_user: root
# 选择 roles 属性
roles:
# 调用 role 目录. roles 同级的目录
- role: nginx
|
1
2
3
4
5
6
7
| - include: group.yml
- include: user.yml
- include: yum.yml
- include: template.yml
- include: copyfile.yml
- include: start.yml
|
1
2
3
| - name: copy conf
template: src=nginx.conf.j2 dest=/etc/nginx/nginx.conf
notify: restart service
|
1
2
3
| - name: copy conf
copy: src=default.conf dest=/etc/nginx/conf.d/ owner={{ username }} group={{ groupname }}
|
1
2
| - name: restart service
service: name=nginx state=restarted
|
1
2
3
| username: nginx
groupname: nginx
|